
The Arts, Sciences & Services of
The Honorable Lady Cailleach Dhe ingen Chiarain
Art as Service: My SCA Exploration.
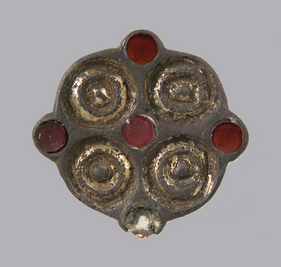
Merovingian-Frankish 6th Century
Whorl-Shaped Brooch
A Reproduction Done During These Crazy Plague Times
Lady Cailleach Dhe ingen Chiarain
MKA Karyn L Driscoll
220249@members.eastkingdom.org
November 7, 2020
Extent Brooch: About
This particular brooch is held by the New York Metropolitan Museum of Art, and was found in a cemetery at the grave of a woman who is believed to have been of high-status, as Sartorial laws only permitted women of high ranking to wear such things. There were a pair of them found, thought to be functional dress or clothing fasteners along with a single brooch for decorative purposes (MerovingianDynasty). It is one-inch in width, and one-quarter inch in depth.
A brooch such as this, with a flat back, was likely molded using lost-wax techniques, wherein a positive image was made out of wax, then plaster was used to create the negative where molten metal was poured into. The finishing details were made using a sharp-edged metal tool, called a graver (Britannica). The glass was likely ground into a fine powder, mixed with metal oxides to create different colors. That concoction was then mixed with an adhesive and melted over a flame or in a furnace allowing it to fill and remain in the divots created in the metal.
Reproduction: About
At an Arts & Sciences competition in 2018, I met a gentleman who was working with metal casting. His work was magnificent and absolutely inspired. Prior to this, my main artistic outlet was butted ring chainmaille, and while the technique technically period, is not considered so in the application I use it for. I knew nearly nothing about metal work, let alone casting. But, of course, there was a piece I wanted to reproduce, and his advice gave me the means to follow through.
I began researching different metals and means of forging and casting, along with a plethora of extent finds. Drawing is not my strong suit, so I began looking for something that had simple shapes to follow, while working my way up to a more complex piece. I stumbled upon this 6th Century Merovingian/Frankish brooch and the more I got to “know” it in my research, the more I fell in love.
While I am prone to acts of service in our Kingdom, rather than showcasing my art, I found that I wanted to dive right into this project, but mundane responsibility got in the way. It wasn’t until October 2020 that I was able to actualize all of this creativity. I began looking into the history of the time period, the clothing and the culture of this brooch. I was fascinated at how so very long ago, the people were able to conceptualize and create jewelry with such advanced techniques as enameling, cloisonné techniques, gilding, glass paste, foil backed stones, filigree and such detail!
My Process:
I decided to sculpt a slightly larger piece than the 1-inch wide extent brooch. The reproduction was made at 1 3/8-inch, because I firmly believe decorative pieces are meant to be seen!
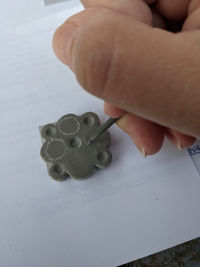
I began by using soft Sculpey clay, rolled it to a uniform thickness with a tube and the handles of a Hedeby bag not yet finished. I then took a circular stencil and traced the outer edge with an Exacto blade. I used the blade to create the rest of the shape free-hand, using a photo of the extent brooch as my guide. I used a round-end tool to create the depth for the “glass” to sit in, and then baked my clay to harden it.
I used metal files to shape and round the edges of the clay, and took a sharp edge to lightly carve the double circles into the face of the shape. When my hands gave up, due to limited fine motor skills, I used a Dremel tool with fine bits to deepen the grooves and smooth out any ridges or sharp edges.
Once happy with my design, I mixed the two parts of MoldMax 60 silicone together and poured them over my clay to make a mold. By affixing the back of my sculpt to the bottom of the container, I created an open-back mold where I could pour the metal directly in, without needing a sprue. After allowing the silicone to cure, I used an electric casting furnace to melt pewter and used a dipper tool to gently pour the metal into the mold. Once cooled, I was able to easily pop the finished brooch out and add a pin or necklace bail to the back using a quick-drying water-proof glue. My “glass” is an oil-based pearlescent paint applied with a paint brush and allowed to dry.
The first round of casting produced very thick, heavy brooches. I went back and did a second pouring where I was able to better control the amount of metal used to make sure the brooches being given were functional. Some pours from the second were incomplete.
While I recognize that how I created these brooches is not period, it was a great learning experience, as well as a cost-effective way to “mass produce” a dozen pieces as a donation to Kingdom largess.
I would like to further my knowledge and experience and recreate this piece using wax, gravers and casting into delft clay, or by carving soapstone and melting bronze in a crucible over flame to align closer to the period methods.
What I used:
-
R98 pewter alloy
-
Electrical casting furnace
-
Sculpey firm oven-bake clay
-
Exacto blade, metal files, Dremel tool
-
MoldMax 60 Silicone
-
Pebeo oil-based paint
-
Pin back or necklace bail
-
Water-proof all-purpose glue
-
Waxed cotton cord
References:
https://www.britannica.com/art/jewelry/Metalwork#ref14072
http://www.merovingiandynasty.org/details.php?id=dynasty_ralics
Ricci, Seymour de. Catalogue of a Collection of Merovingian Antiquities Belonging to J. Pierpont Morgan. Paris: C. Berger, 1910. no. 172, p. 38, pl. VI.


